
Learn how to streamline your payment processing in Salesforce by automatically sending links requesting online payment information from your customers. In this tutorial, we’ll be using Salesforce’s process builder.
We will go over each step to set up a Salesforce Process Builder to automate Payment Requests. This will enable you to send Payment Requests to your customers or donors automatically. Once they receive the request, they can enter their payment quickly and easily.
Chargent Payment Request
The Payment Request is Chargent’s most popular feature. With Payment Request, Salesforce Users can click a button to send a Payment Request to customers and donors. Another user-friendly aspect is that the Payment Request link can be copied and used in other places, such as custom Salesforce email templates and forms. You can configure Salesforce Automation to automatically send out Payment Requests as part of your payment process. Some Salesforce customers even add payment request links to the invoices they send out, using a document generation tool like Conga or Drawloop.
Note: Before you begin setting up this automation, be sure to configure the Payment Request Feature in Chargent Anywhere according to the online configuration instructions found on our website.
Let’s get started! Here are the steps:
Step 1: A Payment Request Record for Every Chargent Order
For the first step:
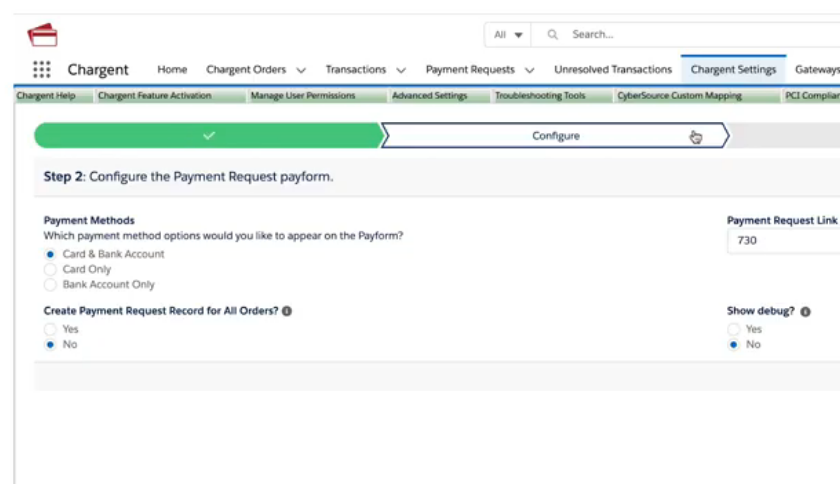
- From your Salesforce account, click on the AppLauncher and navigate to “Chargent Settings.”
- Click on the green subtab here for the “Chargent Payment Request Setup Wizard.”
- Verify that your Payment Request Site is selected here and click “Next”.
- For the setting “Create Payment Request Record for All Orders, select Yes.
- Click Next, and then Next again, and then Finish.
Step 2: Create the Process
For the next step, we will be configuring the Salesforce Process Builder.
- Navigate to Salesforce Setup and type in “Process Builder” into the Quick Find Box.
- Select Process Builder.
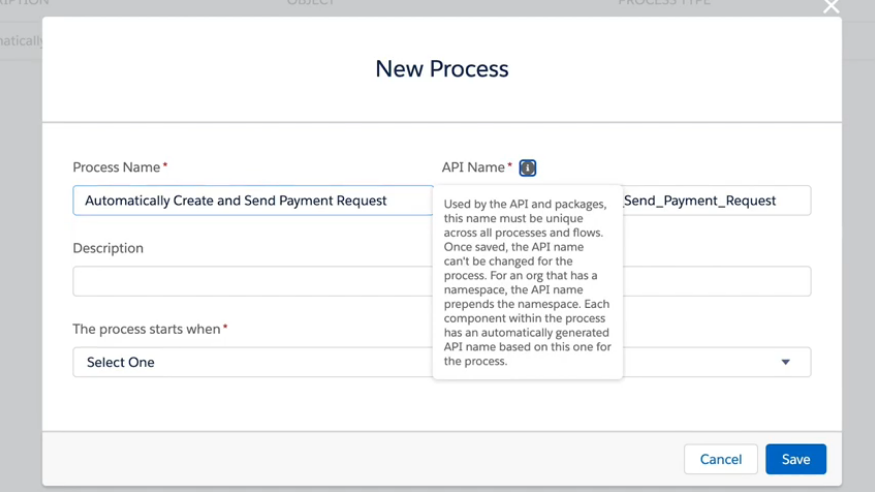
- Click New to create a new Process
- In this screen, give your Process a name that will make it easy to remember what the Process is for. You could call it “Automatically Send Chargent Payment Requests.”
- Click Tab to go to the next field, and Salesforce will populate the field for you. Optionally, you can add a description of the new Process you are building here.
- For the field “The process starts when,” select the option “A record changes.”
- Click the “Save” button.
Step 3: Configure the Process
Next, we will tackle how to configure the Process.
- Click the button “Add Object Here” and select the Chargent Orders Object. If you do not have the Chargent Orders Object in your Org, contact the Chargent Support Team, and we will assist you.
- In the section “Start the Process,” just below, choose the option “Only when a record is created.”
- Click “Save.”
- Next, click the button “Add Criteria.” Give the Criteria a Name such as “Charge Amount is populated.” The Payment Request requires a Charge Amount to be collected from your customer or donor.
Note: You can do authorization transactions with Payment Request, but that topic won’t be covered here. Consult our Knowledge Base or contact the Chargent Support Team for more information about authorizing transactions.
Here are the next selections you’ll need to make in the process:
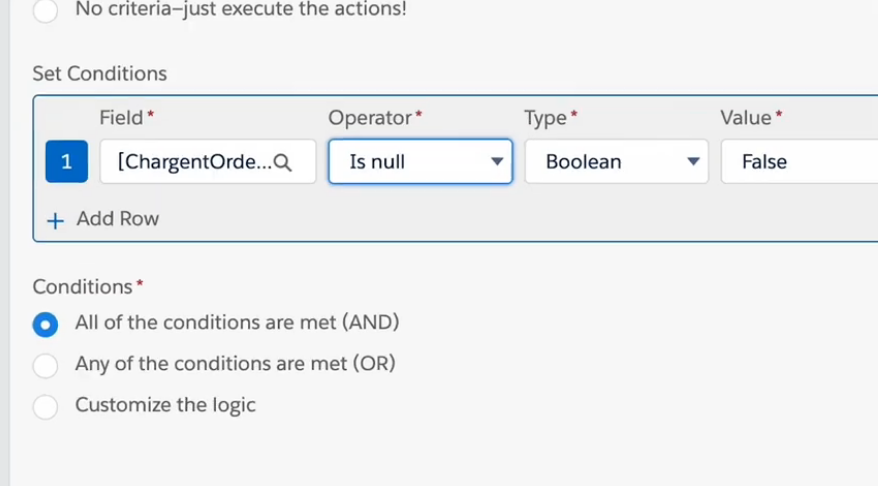
- Criteria for Executing Actions = Conditions are met
- Set Conditions = Chargent Orders Charge Amount
- Operator = Is null
- Type= Boolean
- Value= False
- Conditions Section = All of the conditions are met
Don’t forget to click Save!
Step 4: Add the Action
- Next, under “Immediate Actions”, click on “Add Action”. You’ll have several more selections to make from here.
- Under “Action Type”, select Update Records. Then you will need to create an Action Name here, such as “Update Payment Request Record.”
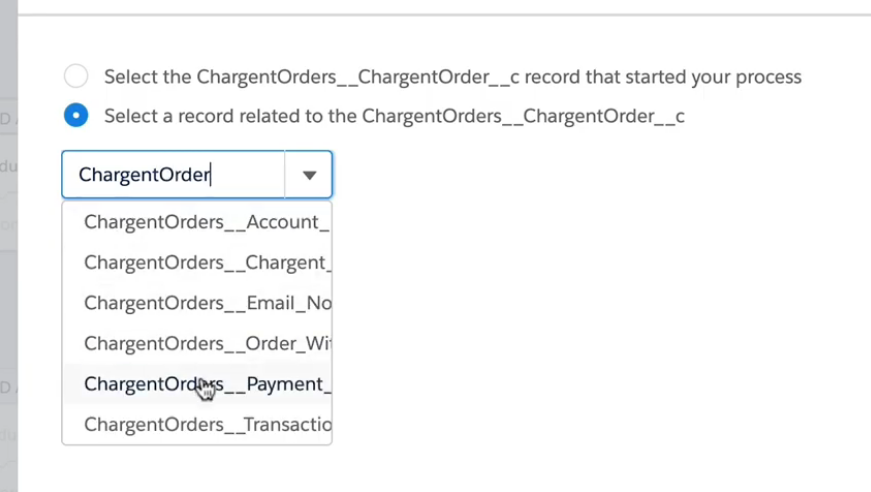
- Under Record Type select “Select a record related to the ChargentOrders__ChargentOrder__c and then ChargentOrders__Payment_Requests.”
- For the section Criteria for Updating Records, select “No criteria—just update the records.”
- After this, you’ll need to Set new field values for the records you update.
- For the first Field, select “Email Address.”
- For Type select “Field Reference.”
- For Value, select the “Chargent Order Billing Email Field.”
- Click “Add Row” to add one more field to update.
- For this last Field, select “Send Payment Request Email.”
- For the Type, select “Boolean,” and for the Value, select “True.”
You’ve come this far, don’t forget to hit Save!
Step 5: Activate and Test
It’s finally time to click the “Activate” button to see your new Process in Action. Create a Chargent Order as you normally do, and you will see the Payment Request being sent to your customer with Salesforce Automation. If your test in Salesforce doesn’t work, you will need to recheck the process to ensure you entered the information in the fields correctly.
Ready to Roll with Chargent Payment Request
Once you have this process set up in Chargent payments for Salesforce, life will get a lot easier. You and your company executives will be happy to know that the Payments Requests are automated and will not be missed. Your customers or donors will automatically receive the payment request email or text, saving you time and money. Your sales team and other Salesforce Users will thank you for saving them that extra step to make collecting payments a breeze.
Chargent for Salesforce is a payment processing app that goes beyond what Salesforce Billing offers. Contact us today to learn more about how to level up your business and integrate Chargent into your Salesforce CRM workflow.