
Learn how to set up a Salesforce Partner Community and add payment capabilities to it for a quick proof of concept, all using standard components. For this configuration, you can use the Chargent Anywhere component to take payments and set recurring payments from the Deals tab (these are your opportunities) in Salesforce Partner Community.
The nice thing is, this works just like when you are in Opportunities in Salesforce as an internal user. It’s straightforward to configure with this guide and can boost your partner relationship management efforts, providing ways for Partners to accept and process payments on your behalf within a Salesforce Partner Community.
Step 1: Lightning Bolt
We are going to start with the Lightning Bolt Template “Partner Central.” You can find that on Salesforce AppExchange, under the Lightning Bolts section.
Salesforce Lightning Bolts are industry solution templates built by Salesforce and partners, helping you get going with Communities faster.
Step 2: Sharing Settings
There are quite a few sharing settings that need to be configured, in order to expose certain Salesforce data in your Partner Community, allow updating, and allow Chargent payments to process.
Here is a quick list. For easy reference, you can also find this in our configuration guide in our documentation on Partner Communities.
Sharing Settings (Org-Wide Defaults)
Sharing settings allow you to determine who can access information within your Salesforce Org. External Access for Communities allows those outside the org in Communities to access specific information that you control.
The following Sharing Settings need to be set in order to set up payments in the Partner Community. Some settings should always be kept as Private while others are controlled by the Parent object.
- Account (customers) and Contract – External Access = Private
- Contacts – External Access = Controlled by Parent
- Leads – External Access = Private
- Opportunities (deals) – External Access = Private
- Chargent Orders – External Access = Private
- Transactions – External Access = Controlled by Parent
- Gateways – External Access = Public Read Only
Step 3: Required Licenses
For this to work, you will need the following licenses installed and enabled:
- Salesforce Partner Community License
- All three Chargent packages (Chargent Orders/Base/Anywhere)
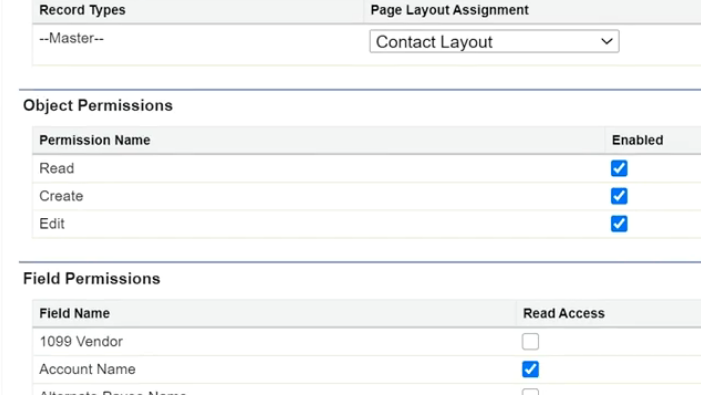
Step 4: Community User Profile
Set up a Profile for a Partner Community User, with the following permissions:
- Object settings
- Accounts = Read, Create, Edit
- Chargent Orders = Read, Create, Edit
- Contacts = Read, Create, Edit
- Leads = Read, Create, Edit
- Opportunities = Read, Create, Edit
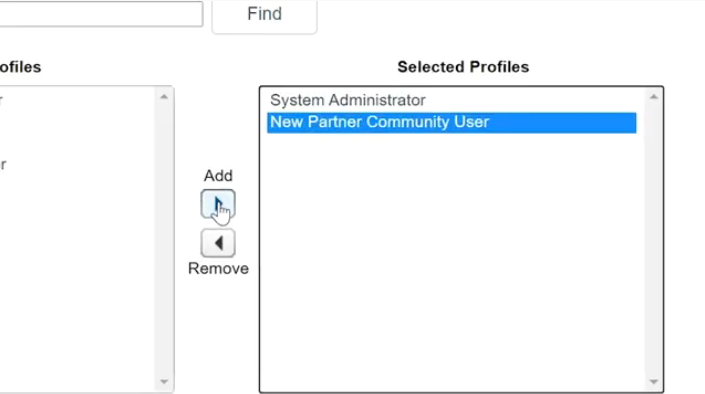
Step 5: Create the Community
You will now set up your Community (Workspaces). The Administration settings and preferences should be as follows:
- Settings
- Status = Active
- Preferences
- Record Ownership
- Default Owner = Happy Chargent Customer
- Record Ownership
- Members
- System Administrator
- Partner Community User
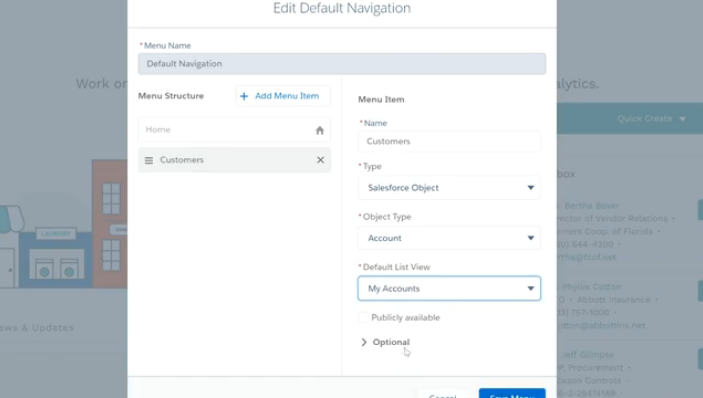
Step 6: Use the Builder
And now the fun part! Use the Builder to create menus and pages.
- Navigation Menu
- Add Menu Item/Rename Accounts (Customers)
- Type = Salesforce Object
- Object = Account
- Default List View = My Accounts
- Add Menu Item Leads
- Type = Salesforce Object
- Object = Lead
- Default List View = All Open Leads
- Add Menu Item/Rename Opportunities (Deals)
- Type = Salesforce Object
- Object = Opportunity
- Default List View = My Opportunities
- Add Menu Item Chargent Orders
- Type = Salesforce Object
- Object = Chargent Order
- Default List View = All
- Add Menu Item/Rename Accounts (Customers)
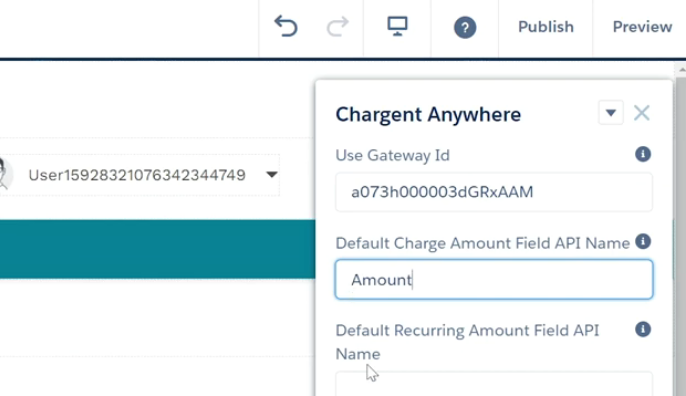
Step 7: Add Chargent
Finally, using the Chargent Anywhere component, you will add payments capabilities to the community that you built!
- Pages Find Opportunity Details
- Page Variations
- Create New Page Variation “Opportunity Detail”
- Make it Default
- Under Properties Change Layout
- 2 columns, 2:1 ratio
- Page Variations
- Add Chargent Anywhere to Opportunity Detail page
- Configuration
- Set Gateway Id for desired Payment Gateway
- Add Default Charge Amount, Opportunity Amount field will work
- Limit Payment Request Contacts = True
- Configuration
If you missed any of the steps or settings, consult the page in our documentation for easy reference.
And now it is time to test. You should log in as a Partner Community user to make sure everything works as expected. As the System Administrator, you will have access to things that regular Partner Community users will not.
Now you have a NO CODE Partner community with recurring billing, ready for your additional customizations! Do you have questions about installing and setting up Chargent in your Salesforce Community? Contact us today – we’re always here to help!