Integrating Ezidebit and Salesforce using Chargent

This guide contains instructions for integrating your Salesforce.com environment with the Ezidebit payment gateway—using the Chargent payment processing plug-in.
- Overview
- Your Ezidebit Sandbox Account
- Prior to setting up Ezidebit in Salesforce
- Setting up Ezidebit in Salesforce
- Testing using Chargent Anywhere
- Sending Live Transactions from a Salesforce Sandbox
- Testing Direct Debit Transactions
- Understanding Transactions
- Verifying Transactions in the Ezidebit Dashboard
- Moving to Production
- Ezidebit Pass Fees to Payer
- Tokenization
- Transaction Synchronization
Connect Ezidebit and Salesforce with Chargent
See all Ezidebit transactions, manage refunds, send payment links and more, all inside Salesforce with Chargent, the top rated payments app on the Salesforce AppExchange.
Not yet a Chargent customer?
Contact us for a no-obligation 30 day trial, and see for yourself!
Overview
Ezidebit is an Australia based payment provider that offers a range of online payment solutions to merchants worldwide. Now part of the Global Payments network, Ezidebit has been empowering businesses, large and small since 1998. Over the years, we’ve helped thousands of businesses across Australia, New Zealand, and Hong Kong to regain control of their cash flow through the use of secure online payment solutions, including Direct Debit and E-Commerce. Ezidebit specialise in bringing revenue more efficiently to businesses across a diverse range of sectors, including childcare, fitness, education, accountancy and charities, to name just a few.
Using the instructions in this guide, it’s easy to connect Salesforce to the Ezidebit gateway with Chargent Payment Processing. Chargent has many features to offer, including automating and streamlining Salesforce payment processes, recurring payments management, click-to-charge buttons, payment request emails, and more.
Integrating Ezidebit with Chargent gives you the ability to easily build a seamless process for completing payment for orders that you manage in Salesforce. The integration connects the Ezidebit gateway directly to Salesforce. Chargent also supports Ezidebit gateway tokenization for processing credit card and direct debit payments.
Your Ezidebit Sandbox Account
The first task is to get a sandbox / test account from Ezidebit so that you can run test transactions from Salesforce. To being the process for obtaining a sandbox account, complete the form on the Enquiry page.

Username and temporary password
Upon approval, you’ll receive an email that contains these testing credentials:
- User ID
- Temporary password
Click the link in the email to go to the administration login page:
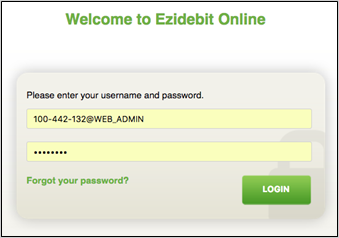
Login with your username and temporary password, and then follow the prompts to change your password.
Need help? Contact Ezidebit through the options given on their FAQ page.
Permanent password
On your first successful login, you’ll get a prompt to enter a permanent password of your own choosing. The password must be:
- Alphanumeric (contain at least a number and a letter).
- Different than your last four passwords.
- At least 6 characters long.
Get your Digital Key
In the same email that contains your credentials you will also find a Digital Key. You will need this to configure the gateway connection in Salesforce.
Production account: You’ll also need to register for a production account. When you’re ready, use the contact information in the enrollment email messages to work with Ezidebit Support and obtain the same set of credentials for your production account.
Prior to setting up Ezidebit in Salesforce
- Install both the Base Package and the Chargent Orders Transaction Package of Chargent into your Salesforce org.
- Configure Chargent according to the Installation and Setup Guide.
For Chargent versions prior to 5.57 you may need to activate the Remote Site Settings in Salesforce if they aren’t already active for Ezidebit.
- Click the gear icon on the top right and select Settings
- Under Security select Remote Site Settings
- Locate Ezidebit_Test and click edit
- Check the Active box
- Click Save
- Do the same for Ezidebit_Live
Setting up Ezidebit in Salesforce
Add an Ezidebit Gateway record in Salesforce using Chargent’s Gateway Wizard.
- Click on the App Launcher on the top left side in Salesforce.

- Select Chargent as the App
- Select the Chargent Settings Tab
- Choose Chargent Setup Wizard

- Do you have a Payment Gateway account – Select Yes
- Select Ezidebit as your Payment gateway.
- Select Test Transactions for testing or Live Transactions if you are looking to process real time payments.
- Follow the prompts to configure your gateway.

You will need the following information:
- Add your credentials based on your Sandbox (Test) or Production Live Ezidebit account.
-
- Digital Key: This is your Ezidebit Digital Key
Other information that will be asked:
- Will you be using tokenization? (recommended)
- What currency will you be using? (AUD, USD, etc.)
- What payment methods will you be accepting?
- Credit cards and/or Direct Debit (electronic check)
- What Credit Card types will you be accepting? (Visa, Mastercard, etc…)
- Payment Console Setup (Premium feature for Platform Edition)
- Show Charge Button
- Show / Create Update Token Button
- Show Authorize Button
Direct Debit Network
Starting with Chargent version 6.15, you can now select the Bank Account network for your region during the gateway setup process. Ezidebit uses the BECS Network. This will allow for the correct Direct Debit Network fields to be displayed on Payment Requests and Payment Console based on your region.
You should choose BECS – Australia as the network. BECS is also known as echeck or electronic check.
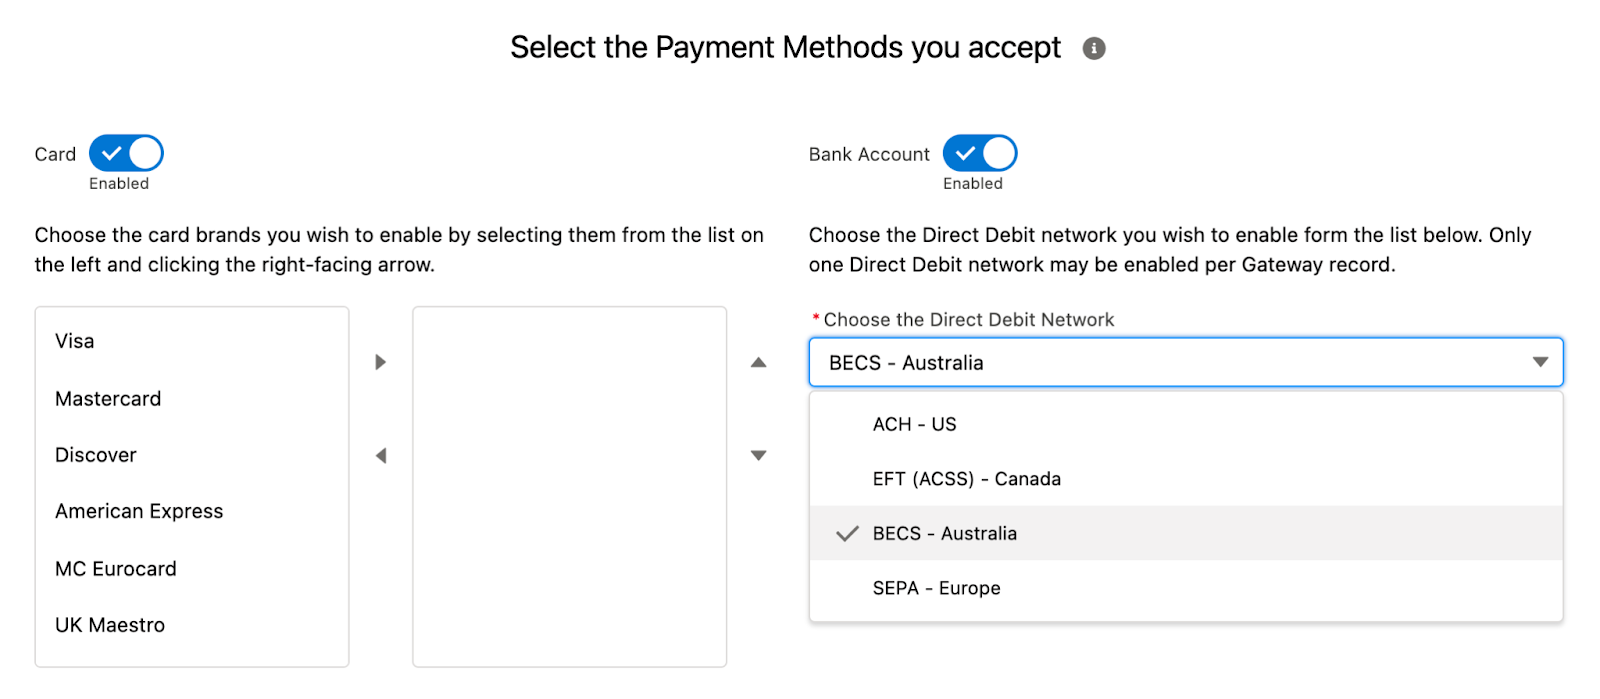
Once you have your Direct Debit Network set, you will see the appropriate field names on your Payment Request that are sent as well as your internal Payment Console.
Testing using Chargent Anywhere
Testing with Payment Console
To test using the Payment Console, you want to navigate to any record in your Sandbox that has the Chargent Anywhere Component enabled.
- Click the [PaymentConsole] button
- If you are using multiple gateways select your gateway from the dropdown otherwise continue to step 3
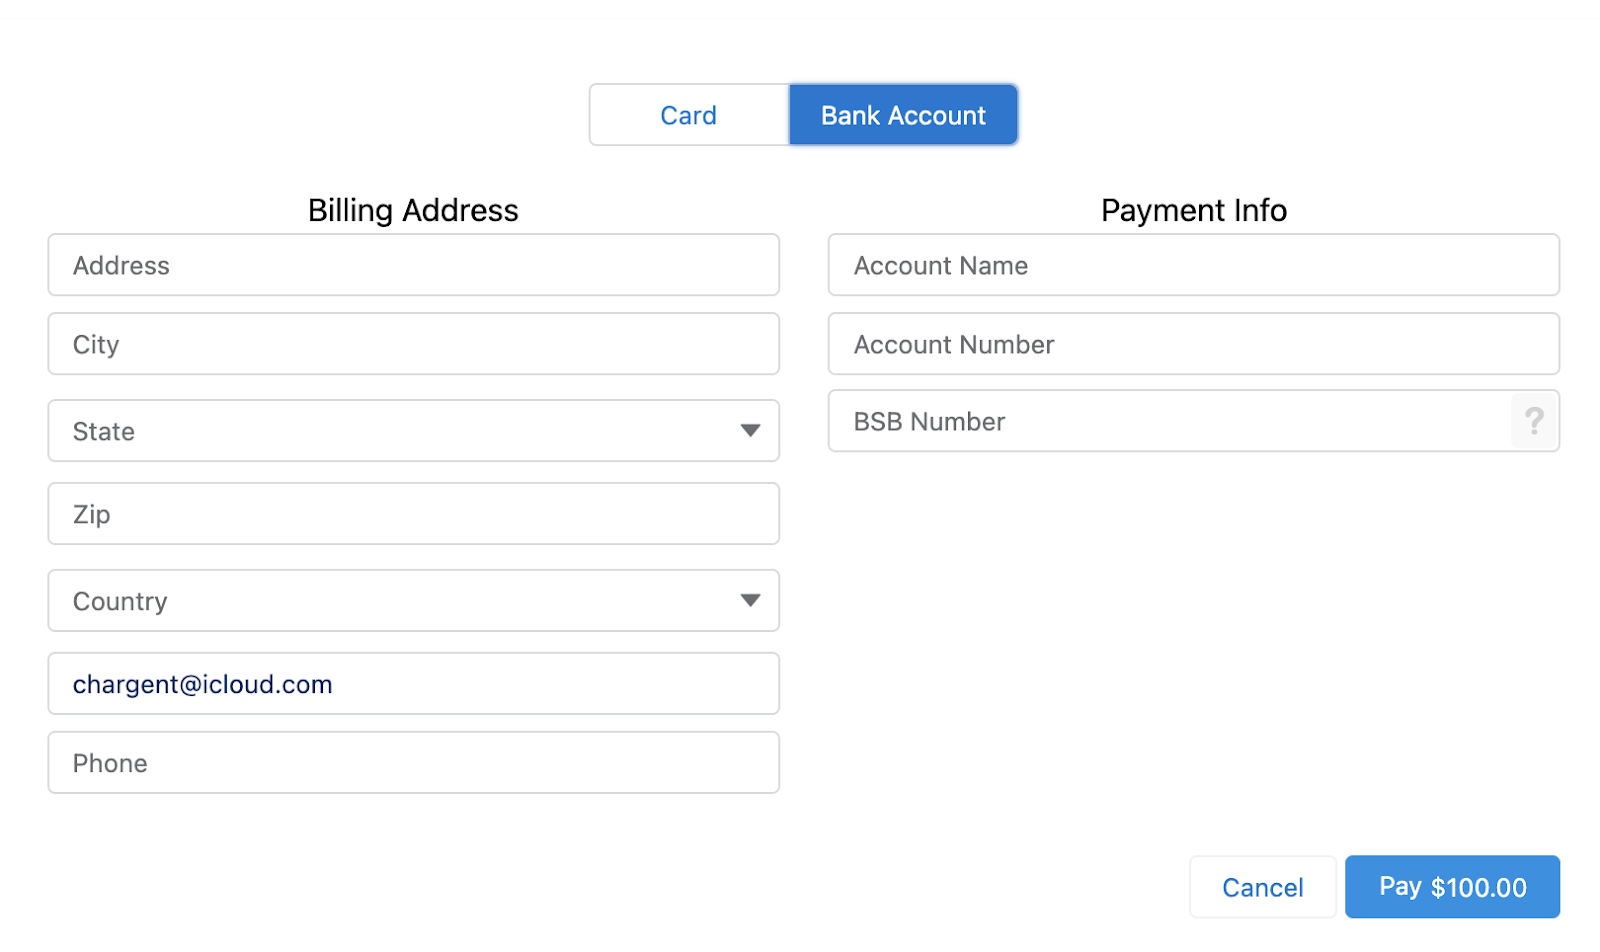
- Enter all the Billing Information and click [Next]
- Enter in a test credit card number, expiration date, and CVC code based on the Ezidebit test credit cards below. If you are testing ACH you can use the Fat Zebra Ezidebit Bank Account test numbers test numbers.
- Click the [Charge] button.
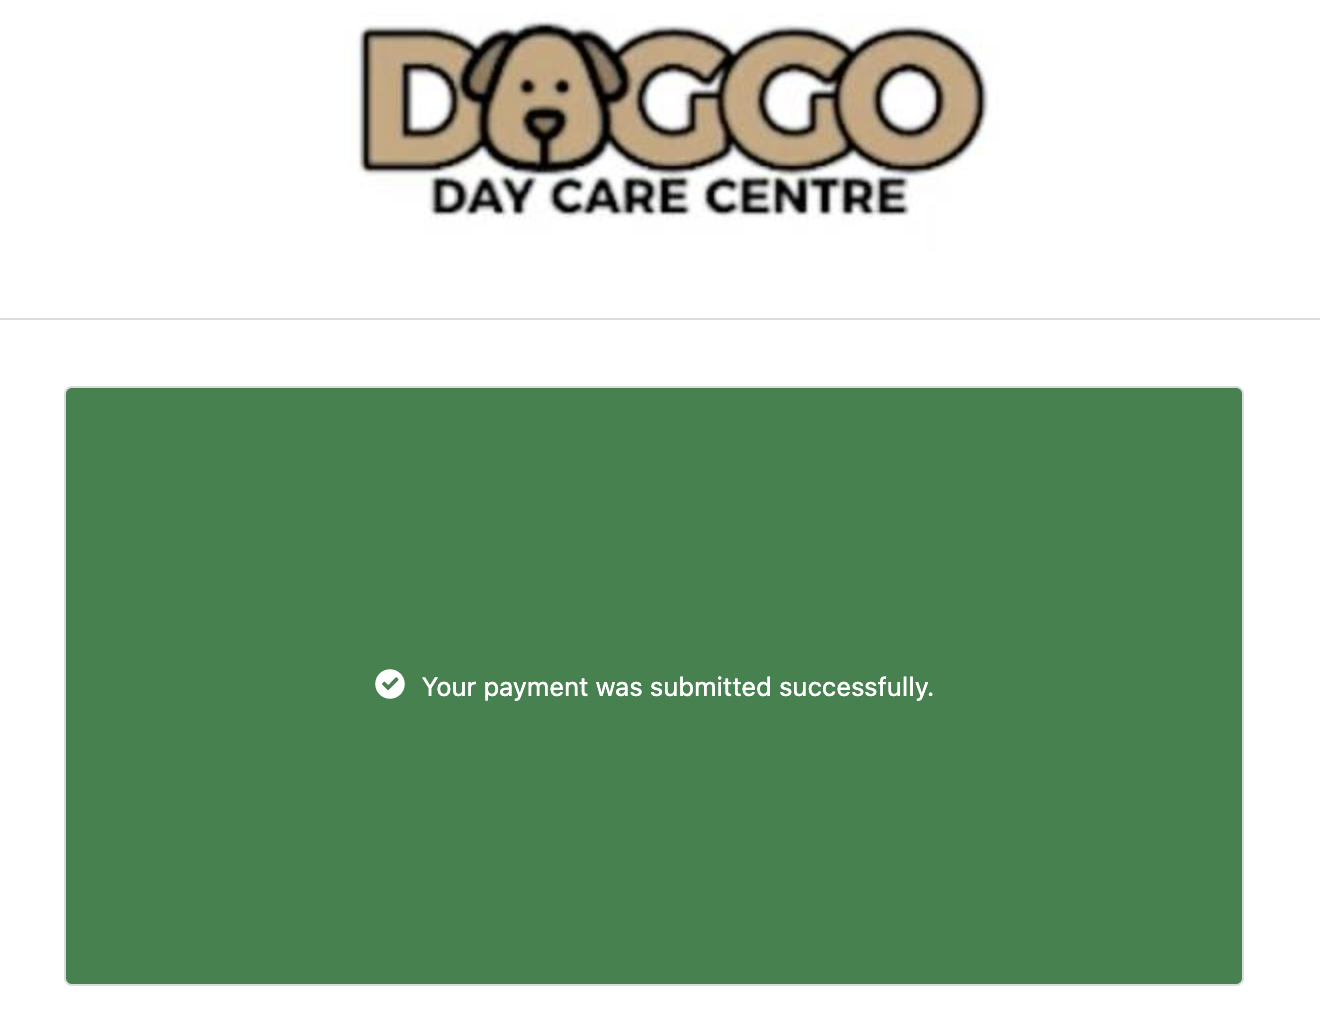
You should receive a green box showing Approved.

Testing using Payment Request
To test using a Payment Request you want to be sure you have the Chargent Payment Request feature set up as outlined in our documentation.
- Click the [Send Payment Request] button
- If you have multiple Payment Request templates set up you will first choose what template you want to use.
- Enter an email address where you want to send the test Payment Request along with any amount.
- Enter a Contact name (Optional)
- Click the [Send Request] button
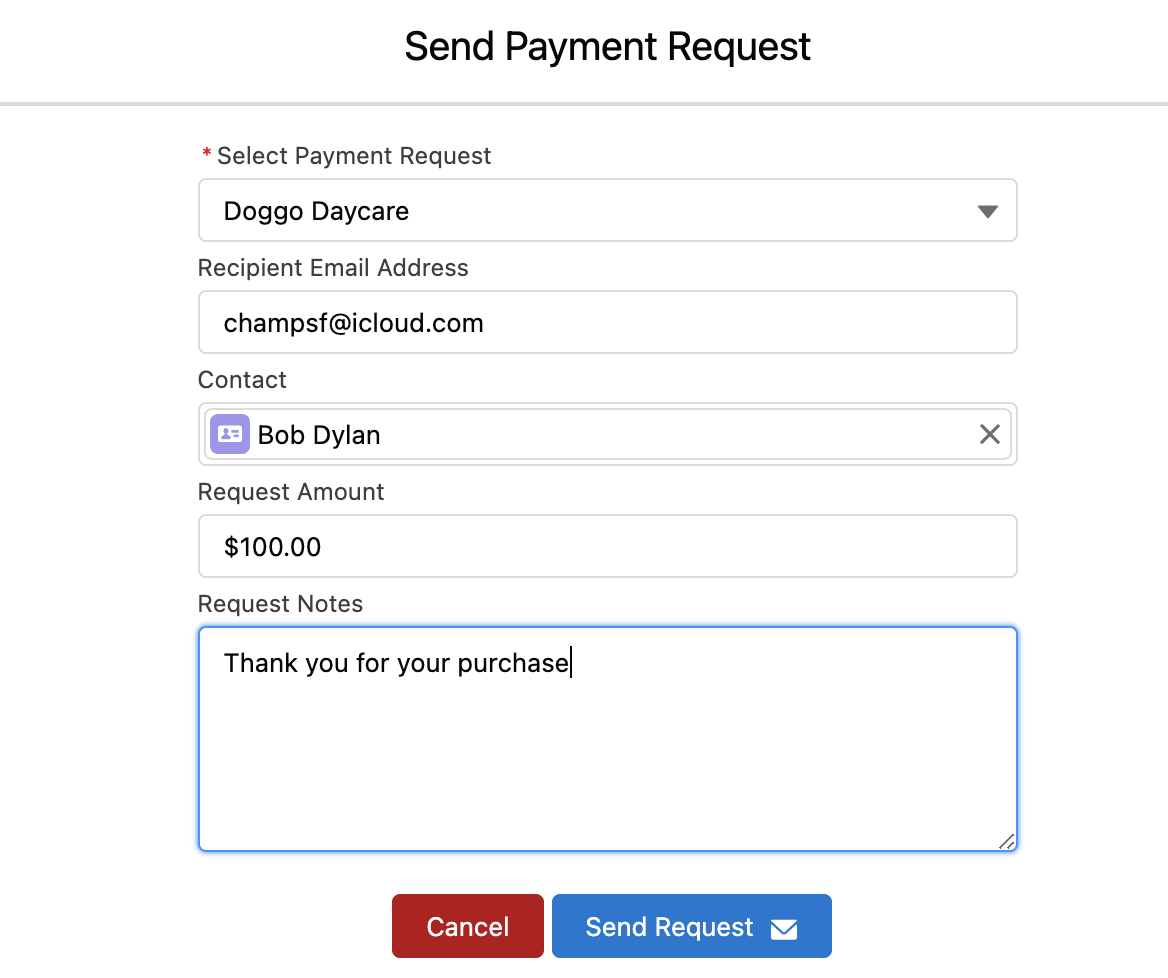
When you receive the email, click the secure link for the Payment Request. Use one of Fat Zebra Ezidebit credit cards or bank account testing numbers to complete the payform and submit the payment.

You should receive a green box confirmation
NOTES
There is no support for authorization or void transactions.
Ezidebit Test Credit Card Numbers
| Card Type | Card Number | Expiration Date | CVN |
| MasterCard | 5123 4567 8901 2346 | Any expiration date in the future | Any |
| Visa | 4987 6543 2109 8769 | Any expiration date in the future | Any |
| Amex | 3400 0000 0000 009 | Any expiration date in the future | Any |
| Amex | 3411 1111 1111 111 | Any expiration date in the future | Any |
| MasterCard | 3421 3589 8797 783 | Any expiration date in the future | Any |
| MasterCard | 3423 3764 9030 528 | Any expiration date in the future | Any |
| MasterCard | 3012 3456 7890 19 | Any expiration date in the future | Any |
See the Ezidebit Credit Card Response page to see which codes will generate various approved and declined transactions for each credit card type. You can trigger an error by varying the numbers in the cents value in the Charge Amount For example, a charge amount of $2.34 will cause an Error 34 response code.
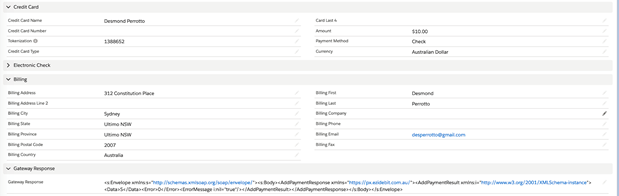
A record is created for each error and each successful transaction, and this record contains the response messages and details that are sent back from Ezidebit. See the figure below for an example. To view the Transactions associated with the Chargent Order click on the Related tab within the Chargent Order.

Sending Live Transactions from a Salesforce Sandbox
When Chargent is installed in a Salesforce Sandbox, transactions are typically sent to the payment gateway’s test / sandbox / development environment, regardless of whether Chargent’s Test Endpoint checkbox is checked. This is done as a security precaution, to prevent real transactions from being accidentally sent from a Salesforce Sandbox.
When Chargent is installed in a production or developer Salesforce org, checking the Test Endpoint checkbox on the Gateway record will route transactions to the test environments provided by the gateway.
Note: Some gateways use the same endpoint for live and test environments. For these gateways, the Chargent application does not prevent live transaction processing. As such, it is best practice to deactivate your live gateway records in orgs used for testing.
If you wish to send live transactions from a Salesforce Sandbox, as a final step in testing, simply use Chargent’s Endpoint Override field on the Gateway record, and enter the production endpoint of your chosen gateway there.
Here is the production endpoint URL for Chargent’s integration with EziDebit:
https://api.ezidebit.com.au/v3-5/
Note that the full endpoint URL must be entered in the Endpoint Override field, and the domain must be present in the Remote Site Settings (for standard Chargent integrations it should be already present).
Testing Direct Debit Transactions
For Direct Debit, it’s important the Australian Bank Account BSB number should be entered in the Bank Routing Number field in Salesforce. Account Number can be any random string of 9 digits.
The BSB (Bank-State-Branch) Number is a six-digit numerical code that identifies an individual branch of an Australian financial institution. The BSB Number is a primary identifier in both the Australian Paper Clearing System (APCS) and Bulk Electronic Clearing System (BECS) payment systems. To perform a money transfer, the BSB Number is necessary—along with the bank account number of the recipient.
Direct Debit BSB Numbers
| CValid BSB | Invalid BSB |
| 012-003 | 012-000 |
| 032-000 | 032-009 |
| 064-000 | 062-008 |
| 082-001 | 081-000 |
| 092-000 | 093-000 |
| 105-000 | 104-000 |
| 112-100 | 112-000 |
| 122-321 | 122-000 |
| 152-147 | 150-123 |
| 212-200 | 200-000 |
Understanding Transactions
When a transaction occurs between Chargent and the Ezidebit gateway, a new transaction record is created in Salesforce. The listing of transactions can be found in the Transaction section near the bottom of the Chargent Order page (or Opportunities or Cases, if you are using those packages). See the figure above.
On the order page, scroll down to that Transactions section and click a Transaction ID link to see the details, as shown in the figure below. This transaction record contains the entire set of data that Ezidebit sends in its response, including transaction Type (Charge, Authorize, Refund or Void), the Response Status (Approved, Declined, Error), and any related approval or error messages.

Verifying Transactions in the Ezidebit Dashboard
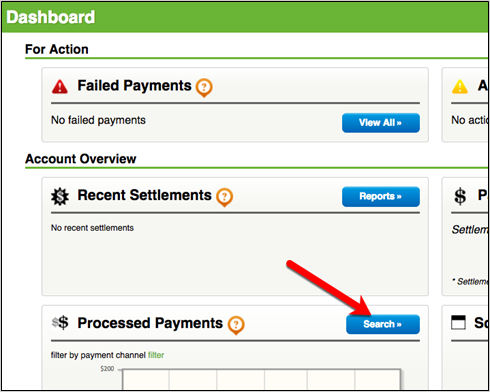
You can compare the transaction records in Salesforce with the records in your Ezidebit dashboard. Login to Ezidebit, locate the Processed Payments section on the Dashboard, and then click the Search button. See the figure below.
Locate the transaction of interest in the listing, and click anywhere on the transaction row to see all details for that transaction.
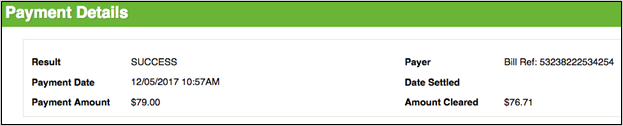
Use the Payment Date and timestamp to compare with your transaction timestamp in Salesforce.
Moving to Production
This section contains the procedure for configuring the integration in a production system.
First, obtain the production credentials for the Ezidebit production gateway account (similar to the method given for sandbox credentials in Obtain a Ezidebit Sandbox Account.
Get these production credentials from your enrollment email message:
- Digital Key
Repeat the steps in the Configuring Salesforce for Ezidebit Integration section above, but substitute the production digital key.
Repeat the steps in the Testing the Ezidebit Integration section above with respect to the SalesForce production environment, using the production credentials.
Void a transaction: If you’re using an actual credit card and want to prevent the charge from settling, remember to void the transaction after testing.
Be sure to successfully transmit at least one real credit card transaction using company or personal accounts. We recommend that you submit a transaction with a very small amount and then void that transaction afterwards. This ensures that the system works with your production credentials.
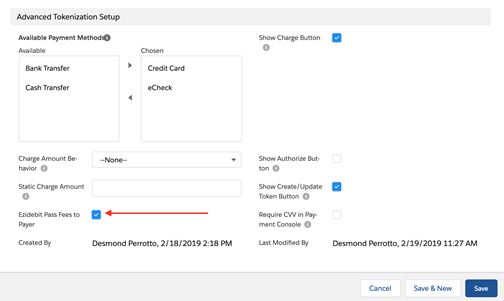
Ezidebit Pass Fees to Payer
The Ezidebit Chargent integration with Salesforce allows you to pass the transaction fees on to the payer via Payment Requests and Payment Console, and display those fees to the payer, as required by Ezidebit. To enable this you need to check the field in your Gateway Settings. This allows you the fees to be displayed in the Payment Console and Payment Request. If you don’t see the checkbox you will need to add the field to the Page Layout.
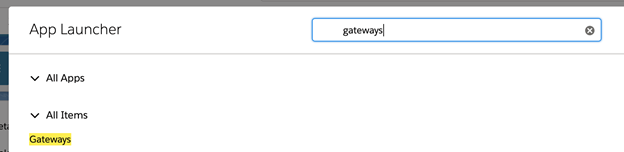
- Select the App Launcher from the top left side of your Salesforce page.
- Search for Gateways in the Search field and select the Gateway object.

- Select Ezidebit gateway and click Edit.
- Check the box that says “Ezidebit Pass Fees to Payer”
- Click Save

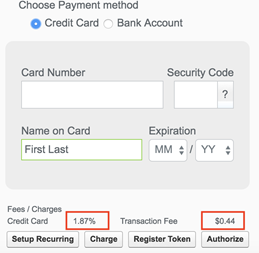
Pass Fees with Payment Console and Payment Requests
You will now see the fees being passed when you send a Payment Request to a customer or open your Payment Console.
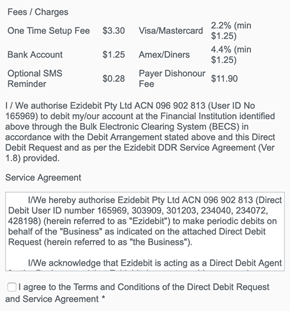
Note, the fees will be different based on Credit Card or Direct Debit. For Direct Debit you will also need to agree to the Ezidebit Service Agreement to allow your business to add these fees.
Credit Card:
Direct Debit:
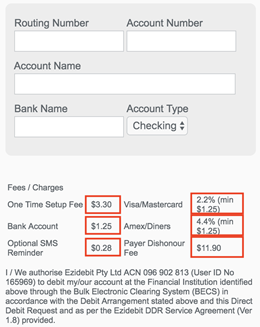
Agree to Ezidebit Service Agreement:
Add the field to the Page Layout
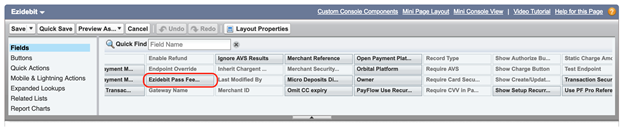
If the Ezidebit Pass Fees to Payer checkbox field isn’t already visible you may need to add it to the Gateway Page Layout.
- Click on the Gear icon in the top right of Salesforce and select Setup – (If you are already on the Gateway page you can select Edit Object and go to Step 4)
- Under Platform Tools select Objects and Fields then select Object Manager.
- Select the Gateway Object.
- Select Page Layouts.
- Select Ezidebit.
- Drag the field called “Ezidebit Pass Fees to Payer” to your Page Layout and click Save.

Tokenization
Chargent supports Ezidebit tokenization for both credit card and direct debit transactions. This section contains the procedure for configuring the use of tokens that pass between Chargent and Ezidebit. Tokens are used to improve security by replacing account numbers in Salesforce, and referencing the data securely stored at Ezidebit.
This may have been selected during the setup of your Ezidebit gateway in Salesforce, however if you are adding tokenization later or have a need to update how the credit card and bank account information is handled, you can follow the steps to ensure account information is cleared when a token is present.
- On the top left hand side of your Salesforce page, click the App Launcher

- Search for and select the Gateways option
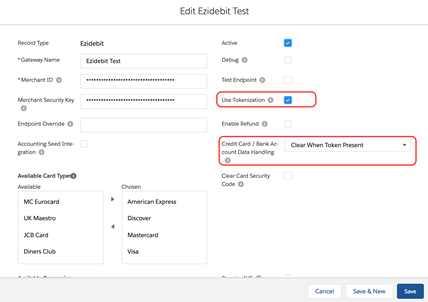
 Select the Ezidebit gateway and click the Edit button on the top right.
 - You want to make sure the following two items are configured.
- Use Tokenization is checked
 Select the Ezidebit gateway and click the Edit button on the top right.
-
- Credit Card / Bank Account Data Handling is set to Clear When Token Present.
We recommend that you choose the Clear When Token Present option, which would cause the Chargent system to erase the credit card number and expiration date after any transaction (Charge, Void, Refund) for a card only if there is a value in the token field.
Note that payments made through Chargent’s Payment Request and Payment Console features tokenize credit card and direct debit transactions in memory, without ever saving account numbers to Salesforce.
Otherwise, you can choose from among these other options:
- Never Clear – Chargent will not automatically remove card data.
- Clear After Successful Charge – Chargent will clear the credit card number, expiration dates, and card security code only after a successful charge occurs for a card.
- Clear After All Transactions – Chargent will erase the credit card number, expiration date, and card security code after any transaction (Charge, Void, Refund) occurs for a card.
-
- Click Save to commit your changes.
NOTE: After your first successful transaction, the token is stored in the Chargent Token field in Salesforce and the credit card fields are handled according to the choice in the Credit Card Data Handling field.
If you use tokenization to process credit cards via the Ezidebit gateway, there is currently a transaction limit of $10,000. The reason for this limit is due to a required field in Ezidebit’s API called paymentAmountInCents.
When Chargent sends a transaction to the gateway, it converts the transaction amount to cents to meet the requirements of the gateway’s API. Ezidebit currently restricts the contents of the paymentAmountInCents field to values less than or equal to 1,000,000 cents. A transaction that exceeds $10,000 will result in an error.
For more information about the current limitation, you can view Ezidebit’s API documentation.
Transaction Synchronization
Chargent has always sent charges and authorizations to the payment gateways, and recorded the result in a real-time Transaction in Salesforce. Chargent can also update Salesforce records long after the initial transaction—for Direct Debit transactions that are returned for non-sufficient funds (NSF), credit card authorizations that expire, and more.
Two fields, Transaction Status and Settlement Date can now be updated through a daily scheduled batch in Salesforce.
Possible values of the Transaction Status are either final or non-final. It the status is final, then no more updates will occur for that transaction. Also, batches will not pick up any transaction having a final status.
The Settlement Date field stores the date and time when the Transaction Status is changed to final (such as “successful” or “fatal dishonour”), after which it will no longer receives any updates.
To schedule the batch, navigate to Setup > Develop > Apex classes, and then click the Schedule Apex button. These are the batch names:
- ChargentOrders.scheduledBatchUpdateTransactionStatus()
- ChargentCases.scheduledBatchUpdateTransactionStatus()
- ChargentSFA.scheduledBatchUpdateTransactionStatus()
As shown in the documentation, the following are the various transaction status values for Ezidebit. Use either of the last two values to learn when a transaction has been dishonoured, and take appropriate action within Salesforce—such as sending an email or assigning a followup task. Previously, it was necessary to do a daily check of Ezidebit reports or wait for a letter in the mail to learn about about the status of such transactions.
- waiting
- pending
- successful
- dishonoured
- fatal dishonour

